To increase the data disk of your nextcloud vm, which is running on proxmox, you need to do the following:
- Make sure no disk snapshot is active or delete them.
- Shutdown VM.
- Check current disk size of your data disk of your nextcloud vm using
lvson your proxmox hypervisor:
root@proxmox1:~#
root@proxmox1:~# lvs
LV VG Attr LSize Pool Origin Data% Meta% Move Log Cpy%Sync Convert
data pve twi-aotz-- <3.49t 0.78 0.28
root pve -wi-ao---- 96.00g
swap pve -wi-ao---- 8.00g
vm-100-disk-0 pve Vwi-a-tz-- 40.00g data 9.99
vm-100-disk-1 pve Vwi-a-tz-- 40.00g data 0.06
vm-101-disk-0 pve Vwi-a-tz-- 40.00g data 58.01
vm-101-disk-1 pve Vwi-a-tz-- 40.00g data 1.60 <-- This is my nextcloud data disk
root@proxmox1:~#
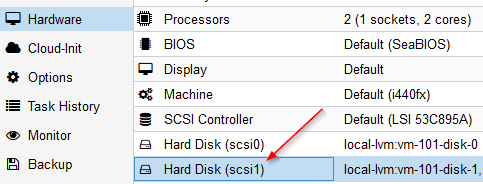
root@proxmox1:~# - In my case this disk is mounted as scsi1 to the VM:
- Increase the disk size using
qm resize <vm-id> <scsi-id> <size>, so for exampleqm resize 101 scsi1 +100Gyour disk:
root@proxmox1:~#
root@proxmox1:~# qm resize 101 scsi1 +3210G
Size of logical volume pve/vm-101-disk-1 changed from 40.00 GiB (10240 extents) to 3.17 TiB (832000 extents).
Logical volume pve/vm-101-disk-1 successfully resized.
root@proxmox1:~#
root@proxmox1:~# lvs
LV VG Attr LSize Pool Origin Data% Meta% Move Log Cpy%Sync Convert
data pve twi-aotz-- <3.49t 0.78 0.28
root pve -wi-ao---- 96.00g
swap pve -wi-ao---- 8.00g
vm-100-disk-0 pve Vwi-a-tz-- 40.00g data 9.99
vm-100-disk-1 pve Vwi-a-tz-- 40.00g data 0.06
vm-101-disk-0 pve Vwi-a-tz-- 40.00g data 58.01
vm-101-disk-1 pve Vwi-a-tz-- 3.17t data 0.02
root@proxmox1:~#
root@proxmox1:~#
- Start your VM.
- Check the zpool size using
zpool list - Check the /mnt/ncdata size using
df -h - Read the new partition size using
parted -lwith the answer "fix" for the adjustment - You can delete the buffer partition 9 using
parted /dev/sdb rm 9 - Extend the first partition using to 100% of the available size
parted /dev/sdb resizepart 1 100% - Use zpool export
zpool export ncdata - Import zpool again
zpool import -d /dev ncdata - Set zpool online
zpool online -e ncdata sdb zpool online -e ncdata /dev/sdbyou can adjust the partition to the correct size- Check the new zpool size using
zpool list - Check the new /mnt/ncdata size using
df -h


Example with nextcloud 20 on Ubuntu 20.04:
root@nextcloud:~#
root@nextcloud:~# zpool list
NAME     SIZE  ALLOC   FREE  CKPOINT  EXPANDSZ   FRAG    CAP  DEDUP    HEALTH  ALTROOT
ncdata  39.5G  46.0M  39.5G        -     3.13T     0%     0%  1.00x    ONLINE  -
root@nextcloud:~#
root@nextcloud:~# df -h
Filesystem                         Size  Used Avail Use% Mounted on
udev                               3.9G     0  3.9G   0% /dev
tmpfs                              797M  1.2M  796M   1% /run
/dev/mapper/ubuntu--vg-ubuntu--lv   39G  5.5G   32G  15% /
tmpfs                              3.9G  8.0K  3.9G   1% /dev/shm
tmpfs                              5.0M     0  5.0M   0% /run/lock
tmpfs                              3.9G     0  3.9G   0% /sys/fs/cgroup
/dev/sda2                          976M  198M  712M  22% /boot
/dev/loop0                          55M   55M     0 100% /snap/core18/1705
/dev/loop1                          56M   56M     0 100% /snap/core18/1932
/dev/loop2                          61M   61M     0 100% /snap/core20/634
/dev/loop3                          70M   70M     0 100% /snap/lxd/18520
/dev/loop4                          62M   62M     0 100% /snap/core20/875
/dev/loop5                          72M   72M     0 100% /snap/lxd/18546
/dev/loop6                          31M   31M     0 100% /snap/snapd/9721
/dev/loop7                          32M   32M     0 100% /snap/snapd/10492
ncdata                              39G   19M   39G   1% /mnt/ncdata
tmpfs                              797M     0  797M   0% /run/user/1000
root@nextcloud:~#
root@nextcloud:~# parted -l
Model: QEMU QEMU HARDDISK (scsi)
Disk /dev/sda: 42.9GB
Sector size (logical/physical): 512B/512B
Partition Table: gpt
Disk Flags:

Number  Start   End     Size    File system  Name  Flags
 1      1049kB  2097kB  1049kB                     bios_grub
 2      2097kB  1076MB  1074MB  ext4
 3      1076MB  42.9GB  41.9GB


Warning: Not all of the space available to /dev/sdb appears to be used, you can
fix the GPT to use all of the space (an extra 6731857920 blocks) or continue
with the current setting?
Fix/Ignore? Fix
Model: QEMU QEMU HARDDISK (scsi)
Disk /dev/sdb: 3490GB
Sector size (logical/physical): 512B/512B
Partition Table: gpt
Disk Flags:

Number  Start   End     Size    File system  Name                  Flags
 1      1049kB  42.9GB  42.9GB  zfs          zfs-4172ff7a9f945112
 9      42.9GB  42.9GB  8389kB


Model: Linux device-mapper (linear) (dm)
Disk /dev/mapper/ubuntu--vg-ubuntu--lv: 41.9GB
Sector size (logical/physical): 512B/512B
Partition Table: loop
Disk Flags:

Number  Start  End     Size    File system  Flags
 1      0.00B  41.9GB  41.9GB  ext4


root@nextcloud:~#
root@nextcloud:~# parted /dev/sdb rm 9
Information: You may need to update /etc/fstab.

root@nextcloud:~#
root@nextcloud:~# parted /dev/sdb resizepart 1 100%
Information: You may need to update /etc/fstab.

root@nextcloud:~#
root@nextcloud:~# zpool export ncdata
root@nextcloud:~#
root@nextcloud:~# zpool import -d /dev ncdata
root@nextcloud:~#
root@nextcloud:~# zpool online -e ncdata sdb
root@nextcloud:~#
root@nextcloud:~# zpool online -e ncdata /dev/sdb
root@nextcloud:~#
root@nextcloud:~# zpool list
NAME     SIZE  ALLOC   FREE  CKPOINT  EXPANDSZ   FRAG    CAP  DEDUP    HEALTH  ALTROOT
ncdata  3.17T  46.1M  3.17T        -         -     0%     0%  1.00x    ONLINE  -
root@nextcloud:~#
root@nextcloud:~#
root@nextcloud:~#  df -h
Filesystem                         Size  Used Avail Use% Mounted on
udev                               3.9G     0  3.9G   0% /dev
tmpfs                              797M  1.2M  796M   1% /run
/dev/mapper/ubuntu--vg-ubuntu--lv   39G  5.5G   32G  15% /
tmpfs                              3.9G  8.0K  3.9G   1% /dev/shm
tmpfs                              5.0M     0  5.0M   0% /run/lock
tmpfs                              3.9G     0  3.9G   0% /sys/fs/cgroup
/dev/sda2                          976M  198M  712M  22% /boot
/dev/loop0                          55M   55M     0 100% /snap/core18/1705
/dev/loop1                          56M   56M     0 100% /snap/core18/1932
/dev/loop2                          61M   61M     0 100% /snap/core20/634
/dev/loop3                          70M   70M     0 100% /snap/lxd/18520
/dev/loop4                          62M   62M     0 100% /snap/core20/875
/dev/loop5                          72M   72M     0 100% /snap/lxd/18546
/dev/loop6                          31M   31M     0 100% /snap/snapd/9721
/dev/loop7                          32M   32M     0 100% /snap/snapd/10492
tmpfs                              797M     0  797M   0% /run/user/1000
ncdata                             3.1T   19M  3.1T   1% /mnt/ncdata
root@nextcloud:~#

Thank you. Worked perfectly on Ubuntu 18.04 + Nextcloud 19
ReplyDeleteGreat, thanks for your feedback :-)
DeleteOoooh man! I've been looking for a solution for 2 days :) Many thanks
ReplyDeleteThank you! Worked perfectly on my Nextcloud 22.1.1 running on VMWare Player. Was able to start at step 6, as I resized the virtual disk via VMWare's GUI.
ReplyDeleteGreat explanation. Thank you!
ReplyDeleteThanks.Worked fine on 24.01.
ReplyDeleteI just ran this on Ubuntu 22.04.2 LTS and nextcloud 26.0.3 successfully. The one issue I had was that parted -l simply did nothing. However, removing partition 9 anyways triggered the fix extra blocks function on its own. I also had to restart after this step before the import/export trick actually picked up the additional space. I am not smart enough to explain why for any of those issues but with any luck it will help someone else. Either way, this method still appears to be function for current versions.
ReplyDeleteWorked perfectly fine with Proxmox 7.4 and Ubuntu 22.04 LTS and Nextcloud v27 - Thank you!
ReplyDeleteWorked without any issues on my v28 Nextcloud hosted on an ESX
ReplyDeleteThank you very much for the explaination!