To increase the data disk of your nextcloud vm, which is running on proxmox, you need to do the following:
- Make sure no disk snapshot is active or delete them.
- Shutdown VM.
- Check current disk size of your data disk of your nextcloud vm using
lvson your proxmox hypervisor:
root@proxmox1:~#
root@proxmox1:~# lvs
LV VG Attr LSize Pool Origin Data% Meta% Move Log Cpy%Sync Convert
data pve twi-aotz-- <3.49t 0.78 0.28
root pve -wi-ao---- 96.00g
swap pve -wi-ao---- 8.00g
vm-100-disk-0 pve Vwi-a-tz-- 40.00g data 9.99
vm-100-disk-1 pve Vwi-a-tz-- 40.00g data 0.06
vm-101-disk-0 pve Vwi-a-tz-- 40.00g data 58.01
vm-101-disk-1 pve Vwi-a-tz-- 40.00g data 1.60 <-- This is my nextcloud data disk
root@proxmox1:~#
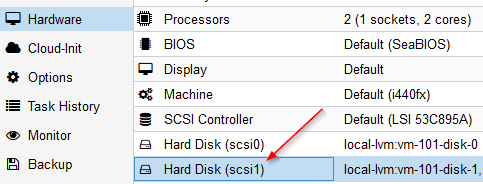
root@proxmox1:~# - In my case this disk is mounted as scsi1 to the VM:
- Increase the disk size using
qm resize <vm-id> <scsi-id> <size>, so for exampleqm resize 101 scsi1 +100Gyour disk:
root@proxmox1:~#
root@proxmox1:~# qm resize 101 scsi1 +3210G
Size of logical volume pve/vm-101-disk-1 changed from 40.00 GiB (10240 extents) to 3.17 TiB (832000 extents).
Logical volume pve/vm-101-disk-1 successfully resized.
root@proxmox1:~#
root@proxmox1:~# lvs
LV VG Attr LSize Pool Origin Data% Meta% Move Log Cpy%Sync Convert
data pve twi-aotz-- <3.49t 0.78 0.28
root pve -wi-ao---- 96.00g
swap pve -wi-ao---- 8.00g
vm-100-disk-0 pve Vwi-a-tz-- 40.00g data 9.99
vm-100-disk-1 pve Vwi-a-tz-- 40.00g data 0.06
vm-101-disk-0 pve Vwi-a-tz-- 40.00g data 58.01
vm-101-disk-1 pve Vwi-a-tz-- 3.17t data 0.02
root@proxmox1:~#
root@proxmox1:~#
- Start your VM.
- Check the zpool size using
zpool list - Check the /mnt/ncdata size using
df -h - Read the new partition size using
parted -lwith the answer "fix" for the adjustment - You can delete the buffer partition 9 using
parted /dev/sdb rm 9 - Extend the first partition using to 100% of the available size
parted /dev/sdb resizepart 1 100% - Use zpool export
zpool export ncdata - Import zpool again
zpool import -d /dev ncdata - Set zpool online
zpool online -e ncdata sdb zpool online -e ncdata /dev/sdbyou can adjust the partition to the correct size- Check the new zpool size using
zpool list - Check the new /mnt/ncdata size using
df -h


Example with nextcloud 20 on Ubuntu 20.04:
root@nextcloud:~#
root@nextcloud:~# zpool list
NAME     SIZE  ALLOC   FREE  CKPOINT  EXPANDSZ   FRAG    CAP  DEDUP    HEALTH  ALTROOT
ncdata  39.5G  46.0M  39.5G        -     3.13T     0%     0%  1.00x    ONLINE  -
root@nextcloud:~#
root@nextcloud:~# df -h
Filesystem                         Size  Used Avail Use% Mounted on
udev                               3.9G     0  3.9G   0% /dev
tmpfs                              797M  1.2M  796M   1% /run
/dev/mapper/ubuntu--vg-ubuntu--lv   39G  5.5G   32G  15% /
tmpfs                              3.9G  8.0K  3.9G   1% /dev/shm
tmpfs                              5.0M     0  5.0M   0% /run/lock
tmpfs                              3.9G     0  3.9G   0% /sys/fs/cgroup
/dev/sda2                          976M  198M  712M  22% /boot
/dev/loop0                          55M   55M     0 100% /snap/core18/1705
/dev/loop1                          56M   56M     0 100% /snap/core18/1932
/dev/loop2                          61M   61M     0 100% /snap/core20/634
/dev/loop3                          70M   70M     0 100% /snap/lxd/18520
/dev/loop4                          62M   62M     0 100% /snap/core20/875
/dev/loop5                          72M   72M     0 100% /snap/lxd/18546
/dev/loop6                          31M   31M     0 100% /snap/snapd/9721
/dev/loop7                          32M   32M     0 100% /snap/snapd/10492
ncdata                              39G   19M   39G   1% /mnt/ncdata
tmpfs                              797M     0  797M   0% /run/user/1000
root@nextcloud:~#
root@nextcloud:~# parted -l
Model: QEMU QEMU HARDDISK (scsi)
Disk /dev/sda: 42.9GB
Sector size (logical/physical): 512B/512B
Partition Table: gpt
Disk Flags:

Number  Start   End     Size    File system  Name  Flags
 1      1049kB  2097kB  1049kB                     bios_grub
 2      2097kB  1076MB  1074MB  ext4
 3      1076MB  42.9GB  41.9GB


Warning: Not all of the space available to /dev/sdb appears to be used, you can
fix the GPT to use all of the space (an extra 6731857920 blocks) or continue
with the current setting?
Fix/Ignore? Fix
Model: QEMU QEMU HARDDISK (scsi)
Disk /dev/sdb: 3490GB
Sector size (logical/physical): 512B/512B
Partition Table: gpt
Disk Flags:

Number  Start   End     Size    File system  Name                  Flags
 1      1049kB  42.9GB  42.9GB  zfs          zfs-4172ff7a9f945112
 9      42.9GB  42.9GB  8389kB


Model: Linux device-mapper (linear) (dm)
Disk /dev/mapper/ubuntu--vg-ubuntu--lv: 41.9GB
Sector size (logical/physical): 512B/512B
Partition Table: loop
Disk Flags:

Number  Start  End     Size    File system  Flags
 1      0.00B  41.9GB  41.9GB  ext4


root@nextcloud:~#
root@nextcloud:~# parted /dev/sdb rm 9
Information: You may need to update /etc/fstab.

root@nextcloud:~#
root@nextcloud:~# parted /dev/sdb resizepart 1 100%
Information: You may need to update /etc/fstab.

root@nextcloud:~#
root@nextcloud:~# zpool export ncdata
root@nextcloud:~#
root@nextcloud:~# zpool import -d /dev ncdata
root@nextcloud:~#
root@nextcloud:~# zpool online -e ncdata sdb
root@nextcloud:~#
root@nextcloud:~# zpool online -e ncdata /dev/sdb
root@nextcloud:~#
root@nextcloud:~# zpool list
NAME     SIZE  ALLOC   FREE  CKPOINT  EXPANDSZ   FRAG    CAP  DEDUP    HEALTH  ALTROOT
ncdata  3.17T  46.1M  3.17T        -         -     0%     0%  1.00x    ONLINE  -
root@nextcloud:~#
root@nextcloud:~#
root@nextcloud:~#  df -h
Filesystem                         Size  Used Avail Use% Mounted on
udev                               3.9G     0  3.9G   0% /dev
tmpfs                              797M  1.2M  796M   1% /run
/dev/mapper/ubuntu--vg-ubuntu--lv   39G  5.5G   32G  15% /
tmpfs                              3.9G  8.0K  3.9G   1% /dev/shm
tmpfs                              5.0M     0  5.0M   0% /run/lock
tmpfs                              3.9G     0  3.9G   0% /sys/fs/cgroup
/dev/sda2                          976M  198M  712M  22% /boot
/dev/loop0                          55M   55M     0 100% /snap/core18/1705
/dev/loop1                          56M   56M     0 100% /snap/core18/1932
/dev/loop2                          61M   61M     0 100% /snap/core20/634
/dev/loop3                          70M   70M     0 100% /snap/lxd/18520
/dev/loop4                          62M   62M     0 100% /snap/core20/875
/dev/loop5                          72M   72M     0 100% /snap/lxd/18546
/dev/loop6                          31M   31M     0 100% /snap/snapd/9721
/dev/loop7                          32M   32M     0 100% /snap/snapd/10492
tmpfs                              797M     0  797M   0% /run/user/1000
ncdata                             3.1T   19M  3.1T   1% /mnt/ncdata
root@nextcloud:~#


